Step-by-step guide to ELISA
Published: November 28, 2022
Updated: June 11, 2025
21 minute read
Authored by: Lara Mentlein
Learn to master each step of the ELISA protocol with the help of this step-by-step guide, ensuring that your next ELISA experiment yields accurate results.
What is ELISA?
The enzyme-linked immunosorbent assay (ELISA) is an antibody-based technique for the detection and quantification of target analytes in solution. The targets are typically proteins, for example, cytokines, chemokines, immunoglobulins, hormones, and other biomarkers.
ELISA setups include direct/indirect (antigen first), competitive, and sandwich ELISAs. Here, we focus on the sandwich ELISA. It’s our favorite not only because it usually has a low background signal, but also as a sandwich ELISA typically increases specificity because of the matched antibody pair.
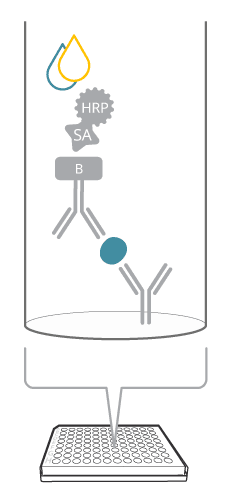
A sandwich ELISA includes both a capture and detection antibody, a so-called antibody pair, recognizing the same target analyte, but different epitopes. How does this assay compare with the image of a sandwich? The antigen is seen as the good stuff (like the cheese or the jam) captured in between the two slices of bread, or antibodies, in the case of ELISA. This biomolecular sandwich is the core of the detection. To quantify the reaction, the detection antibody is either labeled directly, or a secondary detection step is included in the assay. Finally, a soluble substrate is added, where the resulting color will be directly proportional to the amount of analyte bound.
Figure 1. Sandwich ELISA at a glance
The antibody pair in a sandwich ELISA
Choosing a suitable antibody pair is key for a successful sandwich immunoassay. The pair defines the sensitivity, specificity, and dynamic range of the assay. When we look at specificity, it’s crucial that your target is recognized in the form present in the sample (typically the native form), and not only a recombinant or denatured version. If you are running a quantification based on a recombinantly produced standard, antibodies recognizing both the sample protein and the recombinant version are required.
ELISA antibody pairs should recognize two different epitopes on your molecule of interest. Why’s that? You don’t want steric hindrance to interfere with the antibody-antigen binding. (Only if you are detecting homodimers, using the same antibody for both capture as well as detection would theoretically work.) But don’t worry, if you choose an ELISA antibody pair from Mabtech, we have already selected functional antibody pairs to go ahead with.
If you are establishing your own ELISA, you would have to empirically test different concentrations of both the capture and the detection antibody. But if you are replicating one of our ELISA protocols, rest assured that we have already done this titration for you. The actual antibody concentration will vary from assay to assay. For Mabtech ELISAs, the capture antibody is usually added at a concentration of 0.5‑4 µg/ml, while we usually use detection antibodies at 0.5‑1 µg/ml.
At Mabtech, we develop monoclonal antibodies for our immunoassays. Monoclonal antibodies have many advantages over polyclonal antibodies such as superior affinity, known specificity, and low batch-to-batch variation.
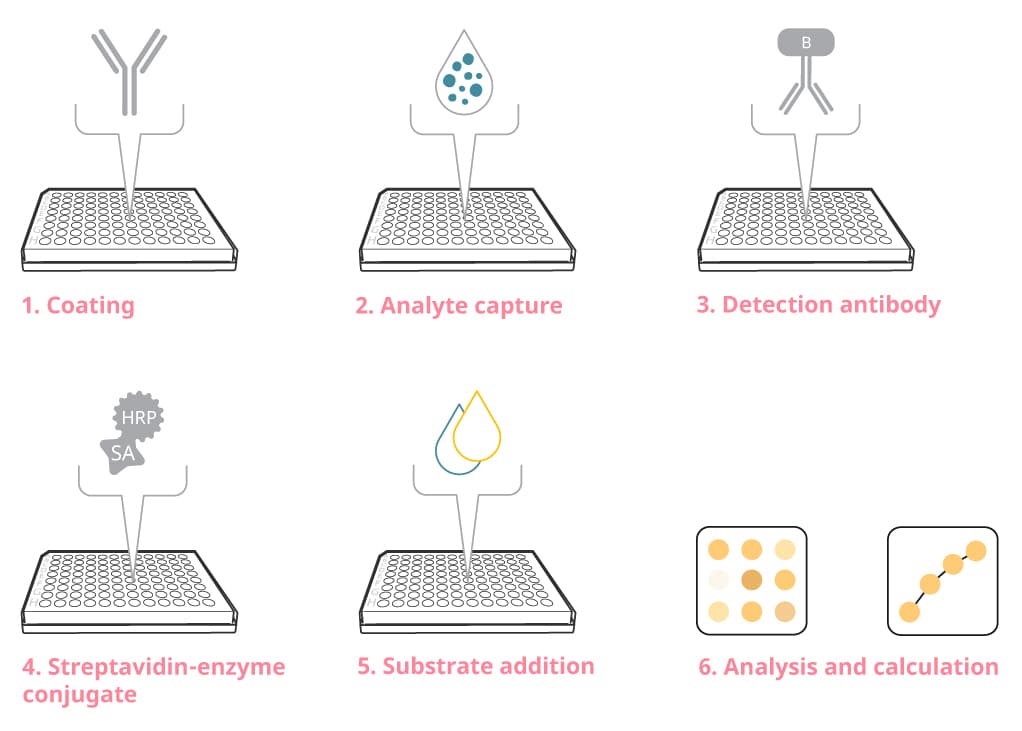
Figure 2. The general steps of an ELISA assay
Coat the plate with capture antibody
From Mabtech's ELISA Flex protocol
Day 1
1. Dilute the capture antibody to the recommended working concentration in PBS. Add 100 µl per well to coat the ELISA plate. Use high-binding ELISA plates. Incubate overnight at 4-8 °C.
Coating
A sandwich ELISA starts with coating the carefully selected capture antibody onto the ELISA plate. The typical coating concentration for an ELISA Flex kit from Mabtech is 2 µg/ml. If you are familiar with the ELISpot technique, you might find it odd that recommended coating concentrations for ELISpot are much higher. This is explained by the different binding capacities of the ELISpot plate, where the PVDF membrane displays a larger binding surface.
ELISA plates
Double-check that you are using a plate facilitating the binding of high amounts of protein. ELISA plates are flat-bottomed plates, usually made of polystyrene, which binds proteins via hydrophobic binding. (This feature of easily binding proteins is why you shouldn’t use this material for the preparation of any protein solutions such as antibodies working solutions, sample dilutions, or standard). This coating works well for larger biomolecules such as antibodies. (More complicated plate coating strategies using covalent or affinity binding are not part of our standard Mabtech ELISA protocols). The pH is usually chosen according to what suits the antigen or antibody best. However, sometimes, ELISA results vary slightly depending on the plastics used. Therefore, you might want to evaluate different plates in case you suspect this as the reason for suboptimal results.
Our protocols are designed for 96-well plates: we add 100 µl per well for all reagent steps. At the blocking and washing steps, higher volumes are recommended.
Finally, you incubate your ELISA plate overnight in the fridge and continue with the experiment the next day.
Pre-coated ELISA plates
If you choose our ELISA Pro kits, you don't have to think about the coating step, since the plates come pre-coated. You’d begin the experiment directly by opening the pre-coated plate and shortening the experiment down to one day. This not only saves time but also increases inter-assay reproducibility. At the end of the day, we are humans, and our pipetting skills are not as perfect as a robot’s.
If you are working with strip plates (included in our ELISA Pro kits), make sure to mark the different strips with a waterproof pen before any accident messes with the order of your strips.
Blocking
From Mabtech's ELISA Flex protocol
Day 2
2. Empty the plate and add 200 μl per well of PBS with 0.05% Tween 20 and 0.1% BSA (incubation buffer) to block the plate. Incubate for 1 hour at room temperature.
Why blocking?
Coating to an ELISA plate is a passive binding activity to the solid phase, so that the biomolecules are immobilized onto the well surface. If one would add antigen or detection antibody directly, these would bind in a similar manner to the plate and consequently cause high background and low sensitivity. That’s why we block. Free binding sites in the well become saturated, eliminating the possibility of non-specific binding. Using a higher blocking volume (200 µl) compared to the reaction volume (100 µl) ensures that free surfaces get covered simply by blocking an extended area.
Blocking reagents
The blocking capacity of BSA (bovine serum albumin) is well documented and, therefore, BSA is very popular as a protein blocker.
Tween 20 is a non-ionic blocking detergent, but of the temporary kind, as it is washed away easily with aqueous solutions. Therefore, Tween is included as a secondary blocking reagent in the block buffer. Plus, if added to the wash buffer, Tween promotes the dissociation of weakly bound molecules and blocks the newly exposed binding sites also during subsequent steps to further reduce unspecific signals.
Washing
From Mabtech's ELISA Flex protocol
3. Wash the plate 5 times with PBS containing 0.05% Tween 20 (300 μl per well).
In ELISA, the assay reagents are added in excess to ensure saturation. Therefore, the removal of unbound reagents is of high importance to avoid unspecific binding. One can wash an ELISA plate by using an automated washer or a hand-held manifold. Different labs might have their own favorite way. We prefer using an automated ELISA washer.
Adding the detergent Tween to the wash buffer along all washing steps reduces unspecific binding as described above. By using excess volumes (300 µl instead of 200 µl or 100 µl in the other steps), the researcher ensures that no residual molecules cling to the walls of the wells. Multiple washes (at least 5 times) with excess volumes are crucial to remove unbound reagents, which might otherwise cause background problems. After the washing steps, remove all wash buffer by tapping the plate against absorbent paper. Immediately proceed to the next step of the assay (do not leave the plate to dry).
Practical tips for all ELISA steps
- Adhesive covers prevent evaporation and contamination during incubation times
- Do not leave the plate to dry after washing
- Change tips in-between samples and standard dilutions
Add standard and samples
From Mabtech's ELISA Flex protocol
4. Add 100 μl per well of sample or standard diluted in incubation buffer or ELISA diluent. Include assay background control such as wells without standard. Incubate for 2 hours at room temperature.
5. Wash as above.
Typically, the samples added contain a crude mix of proteins and other molecules. Therefore, the incubation time in this step allows for the binding kinetics to reach equilibrium. Finally, only your target analyte will be specifically recognized by the capture antibody.
All samples should be diluted at least 2-fold in the chosen ELISA dilution buffer. Use the same buffer for all sample preparations and standard dilutions. Which buffer you choose will depend on the sample type. We recommend incubation buffer (PBS with 0.05% Tween 20 and 0.1% BSA) for cell culture supernatants and ELISA diluent for plasma and serum samples. (Why? Keep on reading…).
Sample preparation
Protein samples should be handled with care and preferably stored below -70°C to prevent degradation by proteases. How you collect, freeze, and thaw your samples varies from sample to sample. Not only the sample type but also the stability of the target analyte may alter how you handle your samples. For example, at Mabtech, we obtain plasma samples by centrifugation at 1000x g for 10 minutes from blood previously collected in anti-coagulant-containing vacuum tubes (e.g., citrate, heparin, or EDTA).
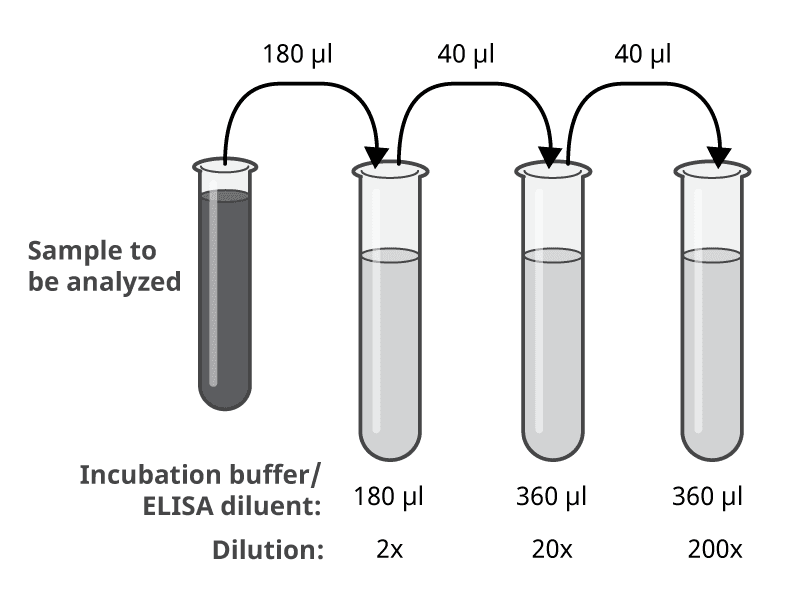
If you have no clue how your samples should be diluted to obtain results within the standard range, we have an ELISA sample dilution suggestion for you (Figure 3). This suggestion covers a range of the three dilutions of 2x, 20x, and 200x. Dilute the samples in the chosen ELISA dilution buffer (incubation buffer or ELISA diluent).
Figure 3. Example of ELISA sample dilutions, giving 2x, 20x, and 200x dilution of the original sample. Volumes will be sufficient for duplicates.
- 180 μl of sample added to 180 μl of incubation buffer/ELISA diluent, giving the total volume of 360 μl, and a dilution of 2x.
- 40 μl of 2x dilution added to 360 μl of incubation buffer/ELISA diluent, giving the total volume of 400 μl, and a dilution of 20x.
- 40 μl of 20x dilution added to 360 μl of incubation buffer/ELISA diluent, giving the total volume of 400 μl, and a dilution of 200x.
Standard preparation
Before you prepare the dilutions for the standard curve, you have to reconstitute the standard. Please observe that the details of the protocol might vary from batch to batch of the standard. Typically, we provide the standard as a lyophilized powder together with the corresponding reconstitution buffer. The reconstitution includes a short incubation before vortexing for the proteins to dissolve properly. After you have removed the amount of standard required for the assay in question, freeze aliquots at -20 °C or below (avoid freeze-thawing).
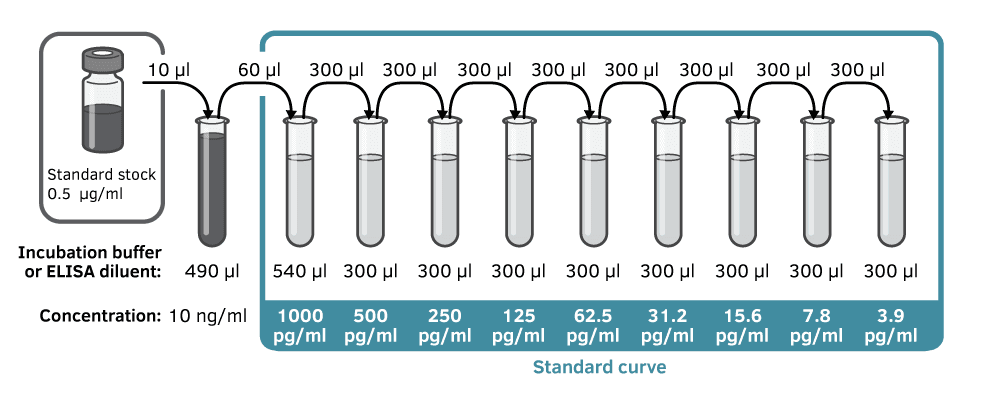
Prepare the serial dilutions of the standard in the same buffer as you will use for your sample dilutions. One suggestion for how to obtain the different concentrations for the standard is shown in Figure 4. The idea is that your standard dilutions should cover the standard range. Use low-binding tubes so that you don’t lose protein because they are sticking to the walls of the preparation tubes. Change tips for every dilution step and mix thoroughly between dilution steps. The dilutions for the standard curve should be prepared no longer than 30 minutes before use.
Figure 4. Standard reconstitution is followed by a serial dilution to obtain standard curve at indicated concentrations. This example was taken from ELISA Flex: Human IFN-α (HRP).
Assay controls
A negative control is a sample that does not contain the analyte of interest. In ELISA this would correspond to the sample containing only buffer (incubation buffer or ELISA diluent). At Mabtech, we refer to this as the assay background control.
The plate blank (or blank for short) is used for subtraction from all the other wells when reading the plate (usually this is done in the software of the reader). Typically, 3-8 wells are assigned to serve as plate blanks. The plate blanks in an ELISA with SA-HRP should include TMB substrate and stop solution, and in the case of SA-ALP, only pNPP substrate. The blank wells should be blocked and washed as all the other wells, but no reagents should be added in the other steps of the assay. We recommend including the assay background control and plate blanks in every ELISA experiment.
In addition, you might include other types of negative controls for comparison purposes. For example, if you analyze cell culture supernatants, you could include the cell culture medium alone.
In ELISA assays, the term positive control (a sample known to contain your protein of interest) is rarely used. In all ELISA kits from Mabtech, a recombinant or native standard is provided. One can say that obtaining a nice standard curve at the end of the assay will serve as your positive control.
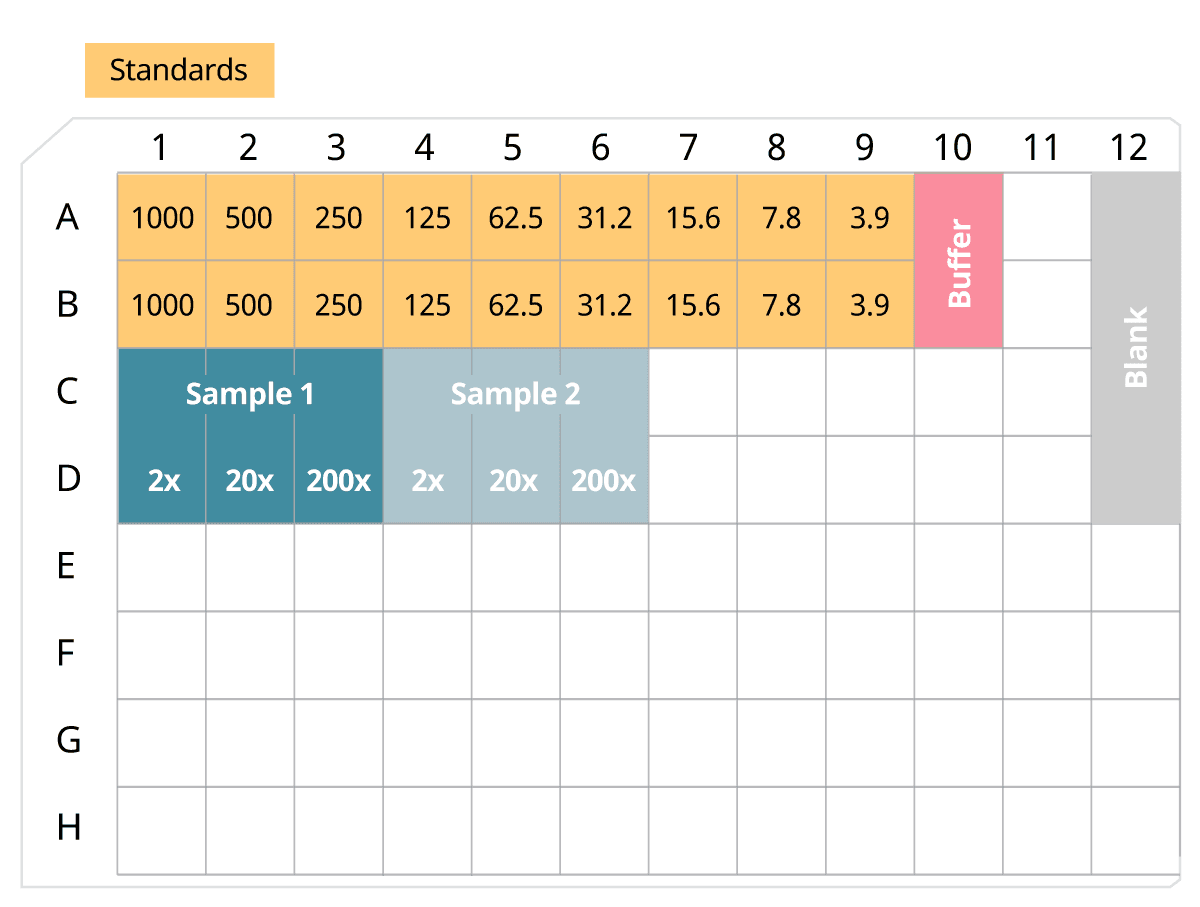
Add your samples at least in duplicates. Take a look at Figure 5 for a typical plate layout. If you run several plates in parallel, include the standard curve, assay background control, and plate blanks on every plate.
Figure 5. A typical plate layout includes the standard curve and samples in duplicates as well as blank and assay background control.
ELISA diluent for plasma and serum samples
A common source for interference or false-positive ELISA results is heterophilic antibodies present in serum and plasma samples. These heterophilic antibodies can bind other antibodies and, by crosslinking the assay antibodies in sandwich ELISAs, lead to false-positive results. Heterophilic antibodies are found in most human individuals, while rheumatoid factor (RF) is often found in blood samples from individuals with autoimmune diseases.
Mabtech’s ELISA diluent, Assay buffer, and Apo ELISA buffer prevent heterophilic antibodies from crosslinking the capture and detection antibodies. This allows the correct determination of analyte concentration in serum or plasma samples. The lack of interference by heterophilic antibodies has been validated using plasma or serum samples from healthy human blood donors. These three dilution buffers vary slightly in their composition depending on the individual ELISA, but they are used during the same assay steps. The appropriate buffer is included in our ELISA Pro kits.
For the analysis of serum/plasma containing rheumatoid factor, we recommend our ELISA PathRF kits. RF can be present in serum or plasma samples from individuals with rheumatoid arthritis, systemic lupus erythematosus, Sjögren’s syndrome, cancer, chronic infections, sarcoidosis, or mixed connective tissue disease. The ELISA PathRF kits are unique in combining a recombinant detection antibody with a specialized RF-block diluent designed to eliminate the risk of RF interference. ELISA PathRF kits have been validated with RF-containing plasma. Learn more about ELISA PathRF kits.
Add detection antibody
From Mabtech's ELISA Flex protocol
6. Dilute the biotinylated detection mAb to the recommended working concentration in incubation buffer or ELISA diluent. Add 100 μl per well and incubate for 1 hour at room temperature.
7. Wash as above.
This step ensures analyte detection using the other partner of your matched antibody pair. The detection antibody should recognize a different epitope on the target antigen than the capture antibody.
One-step or two-step detection?
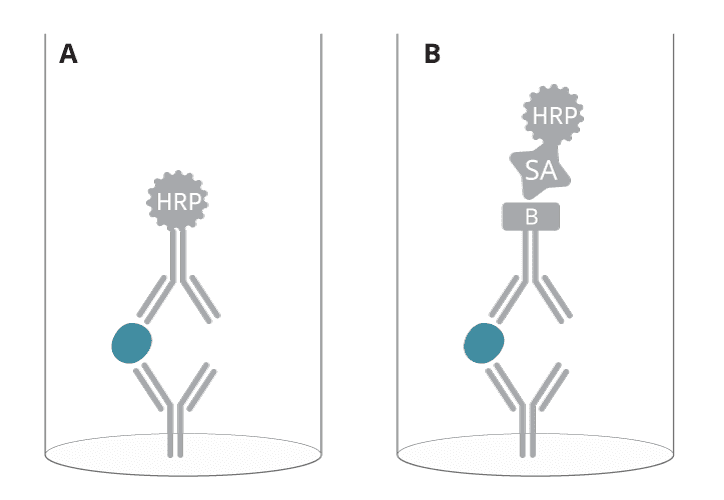
Two ways to finally visualize this detection shall be explained here. Either the detection antibody is directly labeled; this is defined as one-step detection. Or the detection antibody itself is detected in the second step; this is defined as two-step detection. In general, two-step detection is considered more sensitive since the signal is amplified.
Signal amplification with biotin and streptavidin
Our preferred way of two-step detection is using a detection antibody that is labeled with biotin (also known as vitamin B7 or vitamin H, a heterocyclic compound acting as a coenzyme in nature). In a subsequent step, streptavidin (a 66 kD protein in its tetrameric form) binds to these biotin molecules in a highly specific manner. Actually, this is one of the strongest non-covalent bindings observed in nature, a feature transferred to several biotechnology settings.
Figure 6. A) One-step versus B) two-step detection in a sandwich ELISA.
Mabtech’s ELISA kits with one-step detection
Some of our immunoglobulin kits include directly conjugated detection antibodies. When it comes to measuring immunoglobulins, a slightly reduced sensitivity could even be considered beneficial as immunoglobulins are often abundant in the commonly investigated sample types (for example, blood or hybridoma cultures). When it comes to detecting antibodies with antibodies, the assay principle might remain as a sandwich ELISA or be adjusted to a different setup when detecting antigen-specific immunoglobulins. Find out the details in this separate article on ELISAs detecting immunoglobulins.
Add streptavidin-enzyme conjugate
From Mabtech's ELISA Flex protocol
8. Add 100 μl per well of streptavidin-enzyme conjugate diluted 1:1000 in incubation buffer. Incubate for 1 hour at room temperature.
9. Wash as above.
Streptavidin-enzyme conjugates
In immunoassays, the enzymes ALP and HRP serve as markers and are typically applied in the form of enzyme conjugates. This means that the enzymes have been conjugated (chemically bound) to other molecules. In a two-step detection protocol, streptavidin is often part of the conjugate due to its high affinity for biotin and the broad range of biotinylated antibodies available. At Mabtech, we offer two different streptavidin-enzyme conjugates: Streptavidin-HRP (SA-HRP) and Streptavidin-ALP (SA-ALP). Let’s have a look at what differentiates the enzymes used as markers.
Horseradish peroxidase
Horseradish peroxidase (HRP) is an enzyme found in the roots of horseradish. The enzyme catalyzes the colorimetric reaction later in the assay. We prefer HRP because of its rapid kinetics, which makes the reaction fast. That’s why all our ELISA Pro and Path kits include HRP and the complementary TMB substrate. HRP can be degraded by microorganisms and antibacterial agents. Plus, the enzyme can be inhibited by cyanides, sulfides, and azides. That’s why we advise you not to include sodium azide in your buffers if you are running an HRP ELISA.
Alkaline phosphatase
The enzyme alkaline phosphatase (abbreviated ALP or AP) is found as two distinct forms in mammals – the tissue version and the intestine version. Mabtech kits include ALP from calf intestine. The ALP reaction is slower than the HRP reaction but has a more linear activity. When using ALP, you can perform continuous readings to catch the optimal time point for your readout, which might be beneficial in certain contexts. In contrast to HRP, ALP is not affected by the presence of sodium azide or other antibacterial agents. But ALP can be inhibited by cysteine, cyanides, arsenate, inorganic phosphate, and divalent cation chelators, such as EDTA.
Please keep in mind, that these two enzymes require different substrates. In the next section, you will find more details about the substrates.
Add substrate
From Mabtech's ELISA Flex protocol
10. Add 100 μl per well of substrate to all wells, including the plate blanks. Incubate the plate protected from light, at room temperature.
- If using SA-HRP: Use TMB substrate (preferably cold). Incubate for 15 minutes.
- If using SA-ALP: Use pNPP substrate and incubate for approximately 60 minutes. It is possible to read the plate at multiple timepoints during the development
ELISA substrates
The enzyme used dictates which kind of substrate to choose. Classically, ELISAs are performed with colorimetric detection, in contrast to selected ELISAs being based on chemiluminescence or fluorescence. Chromogens are chemical compounds that can be converted through a chemical reaction into a “colored” compound. Such chromogenic substrates are popular in a wide range of assays. Not only does it help following the final steps of your experiment if you can see the result with your naked eye, but the photometers needed for a colorimetric ELISA readout are comparatively cheap and potentially already available in your lab.
Choose soluble substrates for ELISA
In general, there are two types of substrates, categorized by the nature of the products generated during the enzyme-substrate reaction. In ELISA, we use soluble substrates which generate water-soluble colored products. On the other hand, precipitating substrates generate insoluble reaction products, essential in ELISpot, immunochemistry, or Western Blot. So even if a substrate matches your chosen enzyme, please observe that the precipitating version will mess with your ELISA; double-check that you are using a soluble substrate applicable for ELISA.
TMB for HRP
We recommend the use of our ELISA substrate: TMB for HRP when running an ELISA based on horseradish peroxidase (HRP). It contains TMB, 3,3’,5,5’ tetramethylbenzidine and hydrogen peroxide (H2O2). We supply the substrate as a ready-to-use solution which should preferably be used cold.
When added to the plate, the substrate produces a soluble blue product. The TMB substrate is colorless in its reduced form, and only turns blue in the presence of HRP and H2O2. The addition of an acid, e.g., sulfuric acid, stops the enzymatic reaction, which changes the color from blue to yellow. Incubate for 15 minutes at room temperature, protected from light. The absorbance of the stopped reaction is measured at 450 nm.
pNPP for ALP
If you are running an ELISA including alkaline phosphatase (ALP), we suggest the use of our ELISA substrate: pNPP for ALP. The substrate includes p-Nitrophenyl Phosphate (pNPP) and is supplied in diethanolamine buffer as a ready-to-use solution. At Mabtech, we usually run our endpoint determination, which means just one reading, at approximately 60 minutes. But as the optimal reading time point can vary from kit to kit, we recommend you to run multiple readings at 30, 60, and 90 minutes of the same plate when you are setting up a new ELISA in your lab. Incubate the plate at room temperature, protected from light. The substrate produces a soluble yellow product which is measured at 405-410 nm.
Stop solution
From Mabtech's ELISA Flex protocol
11. If using SA-HRP+TMB: Add 100 μl per well of 0.2 M H2SO4 to stop the reaction.
If you are using SA-HRP+TMB, the addition of sulfuric acid H2SO4 will stop the color reaction. The typical incubation time before stopping is 15 minutes, which can be shortened down to 5 minutes in case you observe a fast reaction. The resulting pH change is so drastic, that the enzyme is inactivated, stopping it from further catalyzing the color reaction. The TMB, which was initially blue turns yellow. In this step, you not only stop the reaction, but the resulting derivate is more stable and has a higher absorbance.
Analyze the developed plate
From Mabtech's ELISA Flex protocol
12. Readout
- If using SA-HRP+TMP: Measure the optical density in an ELISA reader at 450 nm within 15 min. Preferably use a reader capable of subtracting a reference wavelength of 650 nm.
- If using SA-ALP+pNPP: Measure the optical density in an ELISA reader at 405 nm. Multiple readings can be performed after, e.g., at 30, 60, and 90 minutes. Preferably use a reader capable of subtracting a reference wavelength of 650 nm.
ELISA plate reading
Make sure that the plate is clean and dry underneath before you place the plate into the reader. The wavelength at which you read your ELISA plate will depend on the substrate you have used (TMB: 450 nm, pNPP: 405 nm). Adjust the reader settings for your preferred wavelength, and if possible, a second wavelength to be used for subtraction (570-650 nm) from all values. At Mabtech, we use 650nm as a reference to subtract the background caused by the plastic.
ELISA readers
When it comes to ELISA readers, it’s a jungle out there. The spectrophotometer should allow you to measure the visible light at a specified wavelength. On the Mabtech site, we use an ELISA reader from Molecular Devices and their SoftMax Pro software. But we also know that some customers extract absorbance values from the data export and use GraphPad Prism for the statistical analysis.
ELISA analysis
Once you have read your plate, the different shades of yellow will come out as OD (optical density) values. But how are these values transformed into concentrations? The unknown concentration of the analyte in your samples can now be determined by plotting the known concentrations of the serially diluted standard to the measured OD values. First, subtract the OD of the reference wavelength (650 nm) measurement from each individual well (usually, the ELISA software makes this subtraction for you if you have made the correct assignments). The plate blank (i.e., the mean OD value at 405 for ALP or 450 nm for HRP of the included blank wells) should also be subtracted from all values before analysis (luckily, the ELISA software makes this subtraction for you as well).
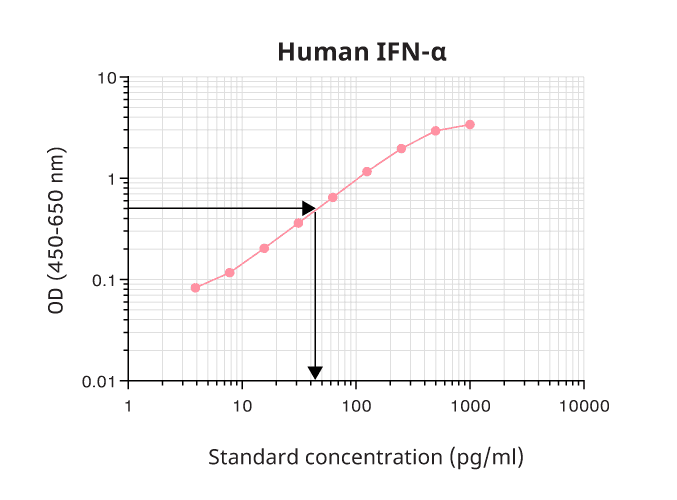
Most ELISA readers come with software that automatically generates a standard curve. We recommend choosing a curve with a 4- or 5-parameter fit. Shouldn’t this be available; you can plot the log10 of the standard concentration (x-axis) against the log10 of the OD (y-axis) (Figure 7). This will lead to accurate determinations, but at a shorter range than that of the 4- or 5-parameter curve. The standard range is the part of the standard curve where the analyte concentration can be determined with accuracy and precision. Don’t forget to adjust the determined sample concentration by multiplying it with the dilution factor. Should the OD value of a sample fall outside the standard range, we would advise you to rerun this sample at a different dilution.
In summary, the color intensity correlates with how much of the analyte has been captured and detected by the antibody pair. The quantification of the target analyte in the different samples can be achieved with the help of the standard curve.
Figure 7. To obtain the ELISA standard curve, the absorbance (log10) is plotted on the y-axis against the concentration (log10) on the x-axis. Within the standard range, you can read off the concentration of your sample as indicated by the arrow. In this example, an OD of 0.5 gives a concentration of around 45 pg/ml.
Do you have any more questions about ELISA? Don’t hesitate to contact our customer support.
