Step-by-step guide to ELISpot
Published: November 10, 2022
Updated: March 28, 2025
Authored by: Jens Gertow
The enzyme-linked immunospot (ELISpot) assay is a sensitive method for quantification of the number of analyte secreting cells. This is an in-depth guide for each step of the ELISpot protocol, including tips and tricks, key details to think about, and best practice.
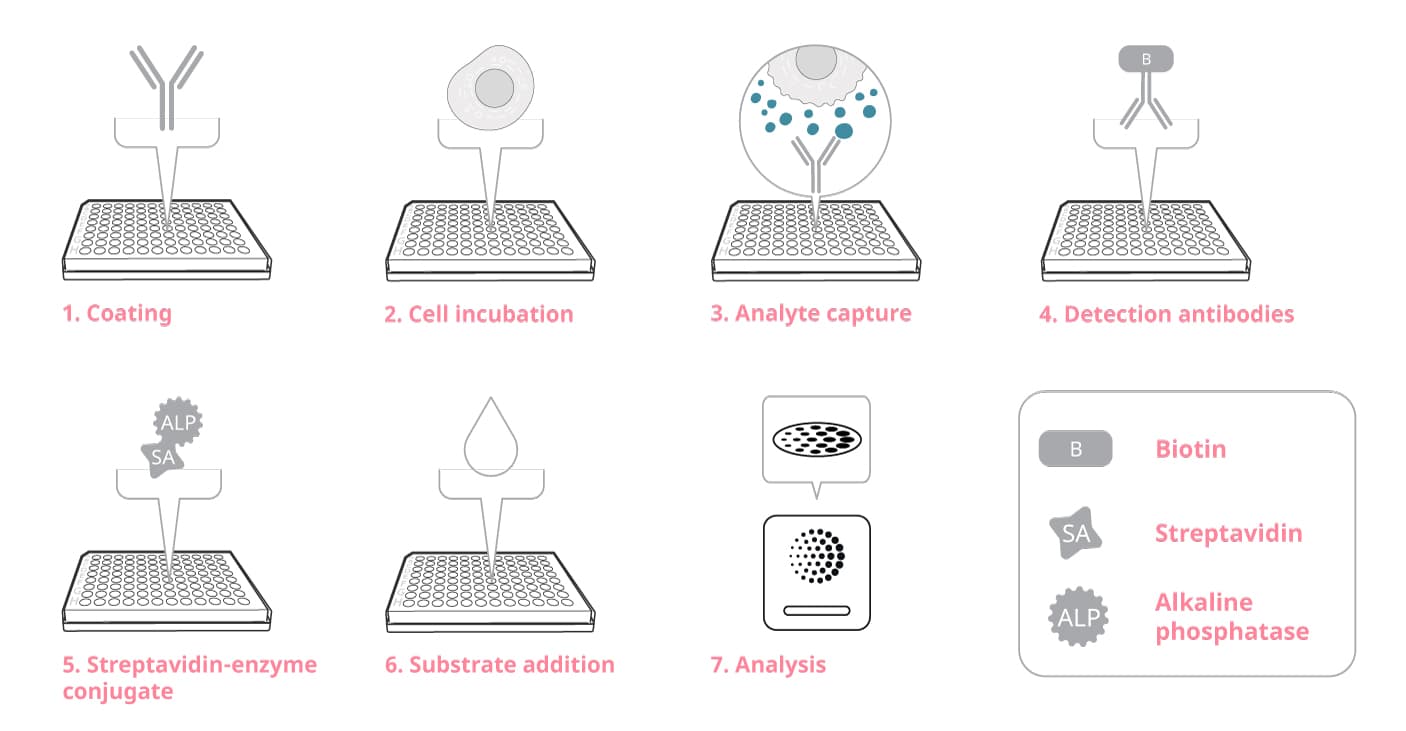
ELISpot is an immunoassay used to quantify analyte-secreting cells. Cytokines, immunoglobulins, or other target proteins secreted by cells are captured by specific antibodies immediately after secretion and throughout the stimulation process. This instant capture makes ELISpot an extremely sensitive sandwich assay, down to the single-cell level.
The assay principle is straightforward: cells are cultured in the bottom of each well on a membrane surface coated with a specific capture antibody and in the presence or absence of stimuli. Thus, target proteins secreted by the cells are captured immediately. After an appropriate incubation time, cells are removed and the secreted analyte is detected using a detection antibody. By using a substrate with a precipitating product, the end result is visible spots on the membrane surface. Each spot corresponds to the foot-print of an individual protein-secreting cell.
The general steps of an ELISpot assay
A cornerstone of ELISpot is high-quality matched pairs of capture and detection monoclonal antibodies (mAbs) that have been developed and selected for the particular application. One might expect that an ELISA sandwich pair of antibodies would work in ELISpot, but our experience is that you need a mAb pair optimized for the task for reliable results from an ELISpot assay.
Having worked with ELISpot for over three decades, we can offer many tips to fine-tune and maximize the success of your assay. We will discuss these suggestions in this guide, starting where the assay begins – with selecting the ELISpot plate – and continue through the 7 general steps of the assay.
1. Coat the plate with capture antibody
Steps under section A in our ELISpot Flex protocols
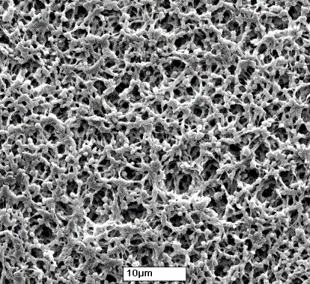
An ELISpot plate is a plastic microplate with a membrane made of polyvinylidene difluoride (PVDF) in the bottom of each of the 96 wells, as opposed to an ELISA plate, which is made only of plastic. The PVDF membrane provides a larger membrane surface which, in turn, increases the amount of capture antibody that can be bound; this feature is vital for a successful ELISpot assay.
PVDF membrane at high magnification resembles a sponge
ELISpot plates
We recommend PVDF membrane ELISpot plates from Millipore:
MSIP plates have a plastic underdrain attached to the bottom surface and are available in clear (MSIPS45) or white format (MSIPS4W). The two colors give a slightly different appearance in the ELISpot readers, but this does not affect the results.
A key feature of the MSIP plate is that it has one “cut” corner top left.
MAIPSWU plates, also called ELIIP, come in a white format. Instead of an underdrain, the plate is placed in a detachable tray. During the washing steps, the plate can be taken out of the tray.
A key feature of the MAIPSWU plate is that it has two “cut” corners top and bottom right.
Ethanol pre-treatment and plate coating – be meticulous
Like a dry sponge, the PVDF membrane needs to get wet before it can absorb (bind) the required amount of capture antibody. We use ethanol for this purpose, as ethanol makes the membrane hydrophilic. In addition, the spot appearance is optimized by using the recommended concentration of capture antibody (this might differ depending on analyte, but is usually 15 µg/ml). If you dilute the capture antibody to lower than recommended concentrations, you risk getting fuzzy spots that are hard to count.
Ethanol pre-treatment is pivotal when coating the ELISpot plate yourself
Higher concentration of capture antibody à More efficient capture of analyte à More distinct appearance of spots à Improved spot count
Diluting the capture antibody leads to fuzzy spots
How to coat an ELISpot plate
1. Add freshly prepared ethanol (diluted from 99.5% stock in sterile water) to all wells you plan to coat. Upon contact with ethanol, the membrane will instantly turn pale grey, indicating that the PVDF has been activated. If you intend to coat several plates, treat one or two plates at a time to stay within the short incubation time for ethanol. Do not leave the ethanol for too long!
• MSIP plates – add 20 µl ethanol (35%) to each well. Leave the ethanol in the wells for no longer than 1 minute.
• MAIPSWU plates – add 50 µl ethanol (70%) to each well. Leave the ethanol in the wells for no longer than 2 minutes.
2. For MAIPSWU plates, empty the plate and wash 5 times with sterile water (200 µl per well). For MSIP plates, you can start by adding water to the wells without removing the ethanol, then wash 5 times with sterile water (200 µl per well).
3. Empty the plate. Add coating antibody diluted in phosphate-buffered saline (PBS; 100 µl per well). We generally recommend a concentration of 15 µg/ml coating antibody (1.5 µg antibody per well), but check the product-specific protocol for details. Leave the plate with coating antibody solution at 4-8 °C overnight.
Tutorial video on how to pre-treat ELISpot plates with ethanol
Tip! The ethanol pre-treatment and plate coating steps (the time spent and the potential issues with it) are omitted if you choose pre-coated ELISpot plates.
Handle the plate carefully
The following tips are applicable for all steps of the assay:
-
Do not allow the plate membrane to dry out during the assay. If your plate membrane does dry out during ethanol pre-treatment – don’t panic, simply repeat the ethanol pre-treatment steps. Tip! During washing steps, leave the liquid of the last wash in the wells and prepare all things necessary for the next step before emptying the plate.
-
Handle plates gently and be careful not to put pressure on the underside of the plate. Grip the plate by the edges, not the top or bottom, and avoid excessive force when emptying it.
-
Do not allow the pipette tip to touch the membrane, as it may damage the membrane and lead to artifacts.
-
Ensure that the dispensed solutions/reagents cover the wells. Also avoid bubble formation when pipetting, as bubbles may hinder reagents from reaching the bottom of the well. Incomplete solution cover or bubble formation may result in blank wells after development.
-
Wash plates using a multichannel pipette when you need to work in a sterile environment, e.g., in a laminar flow hood. When sterile conditions are not required (please check the protocol of the product), you can use an ELISA plate washer but make sure to adapt the washer head position to the shallower wells of ELISpot plates.
Are you not completely happy with your ELISpot results? Check out or troubleshooting guide 7 common ELISpot errors and how to avoid them.
-
When washing plates, avoid getting liquid on the underside of the membrane (not a concern if you use MSIP plates that have an underdrain), as this may cause leakage through the membrane due to capillary force.
-
Do not use Tween 20 in your wash buffer. We know it’s commonly included when running ELISA assays, but please don’t include it for ELISpot. Tween 20 may damage the PVDF membrane and/or solubilize cell membranes, both of which will negatively affect spot formation and appearance.
-
If you need to dissolve your antigen of interest in DMSO, make sure that the DMSO in the cell culture is diluted to a working concentration below 0.5%. DMSO at a higher concentration may damage the PVDF membrane as well as the cells, and cause artifacts.
-
Avoid splashes when emptying plates, as liquid might splash back into the wells. As a final emptying step, tap the plate gently against a paper towel.
2. Add cells and stimuli to the plate
Steps under section B in our ELISpot Flex protocols
Whether you coat the plates yourself or run pre-coated plates from us, by this stage the ELISpot plate will be ready for your cells (after blocking the plate by adding 200 μl of the same medium as will be used for your cells, and incubating at room temperature for 30 min – follow the protocol). Being a cell-based method, cell viability is key to a successful ELISpot assay.
Cells are incubated in the presence or absence of an activating stimulus (an antigen or polyclonal stimulatory agent) at an appropriate temperature, usually 37 °C. The incubation period should allow for optimal analyte secretion and thus can last from a few hours up to a few days. We recommend an assay setup with triplicate wells for all conditions.
Most cell sources can be used – as long as the cells are alive
ELISpot can be applied to basically any cells to investigate protein secretion. We have seen publications with a wide range of cells, including human blood cells, mouse spleen cells, cell cultures, cells from mucosal tissue, heterogeneous cell populations and purified homogeneous cells, and cell clones. The most commonly used cells, at least from human samples, are peripheral blood mononuclear cells (PBMCs). They can be obtained from blood by density centrifugation using e.g., Ficoll. The resulting PBMCs can be used directly or may be frozen for later use.
Freezing:
Standard freezing procedures include the use of DMSO and FCS in the medium. We first put the vials with cells in a freezing container at -80 °C overnight and then transfer to liquid nitrogen or a freezer at -150 °C.
Thawing:
After washing the cells twice (to get rid of the DMSO), the cells should be rested in fresh medium for 1 hour at 37 °C. This allows for removal of cell debris, which will improve assay performance.
Cell quality is crucial for reliable results
Using samples with a high proportion of viable cells and a low proportion of apoptotic or dead cells will give you the greatest likelihood of success. This is not unique for ELISpot, but true for any cell-based assay. If your sample contains a high proportion of dead cells, you cannot rely on your final results as they are based on the ratio of responsive cells (spot-forming units) to total cells.
Freezing and thawing cells is not a problem if you do it right. But an important note is that PBMCs should be prepared as soon as possible after blood collection. This is because cells prepared from blood samples older than around 8 hours may be contaminated with activated granulocytes which can interfere with the results. If blood samples must be stored before preparation (for example over-night if you received the sample late in the afternoon), high-quality PBMCs can be obtained by:
- Gently agitating the blood samples
- Diluting the blood samples 1:1 in PBS or RPMI
- Depleting the granulocytes from the blood samples using commercial depletion kits, e.g., from Stemcell Technologies
Choose a cell culture medium appropriate for your cells
The cell culture medium plays a crucial role in the well-being of your cells. We recommend RPMI 1640 with L-glutamine and 10% fetal calf serum (FCS) for most cells. At Mabtech, we usually supplement the medium with HEPES to maintain the pH of the cell culture, and antibiotics to decrease the risk of contamination. Since RPMI 1640 might not be the optimal medium for your experiment, you must do the homework of checking which medium is best for the cells you are studying.
Generally, we recommend FCS as the source of serum. Different serum batches may vary in their content and functionality, and it’s wise to test a new serum batch before use in ELISpot. The serum used should be selected to support cell culture and give low background staining, i.e., should not itself give rise to cell activation or protein secretion. We advise you not to use homologous serum (e.g., human serum for human samples), as it might contain the analyte you intend to detect and/or heterophilic antibodies, both of which may cause background noise.
Our in-house cell culture medium:
-
RPMI 1640
-
10% FCS
-
2 mM L-glutamine
-
10 mM HEPES
-
100 µg/mL penicillin
-
100 µg/mL streptomycin
If FCS cannot be used in your assay, it is possible to use a serum-free medium containing defined proteins as a substitute for serum. Of all serum-free media we have tested, AIM-V works best for ELISpot.
Regardless of which cell culture medium you choose, it’s essential to use the same medium throughout the assay, including the blocking/conditioning step before adding the cells. Using the same media ensures the cells' environment remains constant in each step, reducing the number of variables that could affect the final results through non-specific stimulation.
Choose a suitable cell number
At this point, the plate has been coated with capture antibody and conditioned with cell culture medium for at least 1 hour at room temperature. Before adding cells to the plate, you need to count and adjust them to the required concentration in cell culture medium.
Cell counting can be done with an automated cell counter or trypan blue staining using a microscope. Because only living cells will be able to secrete the analyte, make sure to exclude dead and, if possible, apoptotic cells from the cell count. If the cell concentration turns out to be lower than required, you will need to concentrate the cells by centrifugation.
The following should be considered:
-
If unsure, start with 250,000 cells per well
The number of cells in each well must be adapted to the cell type and the expected frequency of secreting cells: The lower the expected frequency of responding cells, the higher the number of cells per well. If the expected frequency is 1 in 10,000 cells, you will need approximately 250,000 cells per well. Conversely, when the frequency is high, for example 1 in 100 cells, it’s sufficient to seed 50,000 cells per well. In general, antigen-specific responses require higher cell numbers (e.g., 250,0000 cells per well) than polyclonal/mitogenic positive controls (e.g., PHA, 50,000 cells per well). -
Cells “like” to be in contact with other cells
The number of spot-forming units measured in ELISpot does not always correlate with the total number of cells because a minimum number of cells is required for proper cell-to-cell contact and thus optimal stimulation. For example, when analyzing antigen-specific T cells in a PBMC sample, total cell numbers should not be less than 200,000 cells per well. -
Avoid vortexing
Resuspend cells and pellets gently using a pipette. -
It is sometimes beneficial to stimulate cells before adding them to the ELISpot plate
For analytes that need a longer time for secretion to be initiated, it is possible to pre-stimulate the cells (preferably in round-bottom polypropylene tubes or plates to augment cell contact) before adding them to the ELISpot plate. This is good practice in certain circumstances, e.g., when stimulating memory B cells for 72 hours with R848 + IL-2 to facilitate differentiation into immunoglobulin-secreting plasma cells. If you choose pre-stimulation, it is important to note that cells must be washed before addition to the ELISpot plate to avoid background staining of the membrane.
Seed and stimulate the cells
When you have chosen the cell number that is appropriate for the experiment, it’s finally time to seed the cells onto the plate and stimulate them. In addition to your stimulus of interest, we recommend you to include three control conditions:
Positive controls
Antigen-specific or polyclonal
-
Indicate if the assay works and the cells are functional
-
Reveal false negative results
Negative controls
Cells without stimuli
-
Indicate the number of spontaneously secreting cells
-
Reveal false positive results
Background
No cells, but all other reagents
-
Indicate if reagents induce false spots (aggregates)
-
Reveal false positive results
Choosing the relevant compounds for control stimulation is largely dependent upon the cell type and the nature of your experiment. Stimuli can be monoclonal antibodies (anti-CD3 for T cells) or peptides (CEFRAS Global peptide pool for CD8+ T cells, or CEFTA peptide pool for CD4+ T cells), synthetic compound (R848+IL-2 for B cells), or substances purified from bacteria or plants (PHA for T cells). Antigen-specific stimulation using peptide pools or monoclonal antibodies are preferable in our view, since these reagents are well defined. We've collected good info on peptide pools and polyclonal stimuli here.
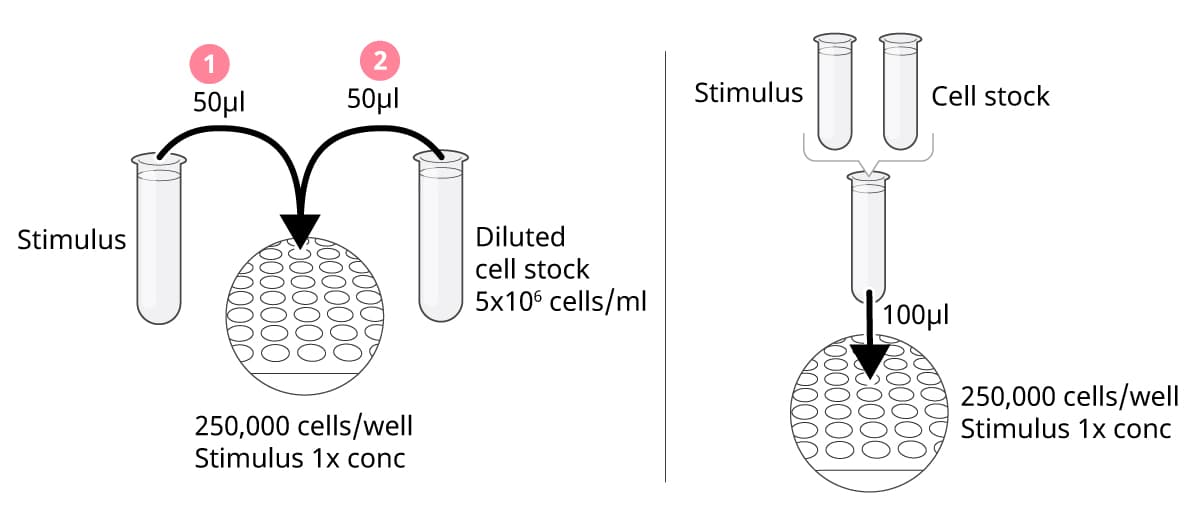
For all types of stimuli, antigen-specific or polyclonal, we recommend either of the following two techniques:
I. Add stimuli first, then cells
With this approach, stimuli and cells are added separately to the plate. When equal volumes of stimuli and cells (50 µl each) are added sequentially to each well, the stimuli and cell suspensions should be prepared at 2x the final assay concentration. A cell concentration of 5x10⁶ cells/ml will give you 250,000 cells per well. It is crucial to add the stimuli first and then the cells. Do not add anything to the wells after the cells have been seeded, as this could push the cells to the edges of the wells, leading to suboptimal results.
II. Mix the cells and stimuli in tubes before addition to the plate
Mix the cells and stimuli in tubes to the final assay concentrations. Add 100 µl per well; a cell concentration of 2.5x10⁶ cells/ml will give you 250,000 cells per well. Because cells will continuously sediment in the tubes, remember to carefully resuspend the cell suspension throughout this procedure.
If your samples take up only a part of the plate, fill the surrounding wells with medium only (100 µl per well) to minimize evaporation from your samples during incubation.
Put the plate in the incubator
With the cells and stimuli added to the plate, the next step is to put the plate into an incubator. In general, the temperature of the incubator should be 37 °C with a CO2 level of 5%. Two things to think about when incubating cells:
-
Wrap the plate in aluminum foil
Most incubators maintain an optimal level of humidity, but it is good practice to wrap the plate in aluminum foil during incubation to reduce the risk of evaporation of the cell culture medium. -
Place the plates next to – not on top of – each other
Do not stack plates in the incubator. Stacking plates can lead to uneven conditions between the plates (e.g., temperature, CO2 level, evaporation rate), which may affect the cells and thereby the spot numbers.
3. Let the antibodies capture the analyte
Steps under section B in our ELISpot Flex protocols
In contrast to ELISA, ELISpot uses specific capture antibodies in the bottom of the well to capture cytokines, immunoglobulins, or other target proteins immediately after secretion and throughout the stimulation process. This is what makes ELISpot so sensitive.
With the plate in the incubator, you can now just wait for the antibodies to capture the analytes. It is important to note that:
-
Different analytes have different kinetics
Consider the kinetics of secretion of the protein when establishing the optimal cell incubation time. Some analytes, such as granzyme B, are fully secreted only after more than 48 hours of stimulation, whereas others, such as IFN-γ, can be analyzed after only 12 hours. -
The plate must not be moved during incubation
Avoid moving the plates during the incubation, as this can negatively affect spot formation. Even small movements should be avoided, so close the incubator door gently.
4. Add detection antibody
Steps under section C in our ELISpot Flex protocols
After the incubation step, the cells have secreted analyte in response to the stimulus, and the analyte has been captured by the specific antibodies coated on the plate. Time to detect. It might be obvious, but we’re saying it anyway: With ELISpot, you are detecting the footprint of the cell that was there, secreting the analyte you are studying. Thus, begin by washing away the cells: empty the plate and wash 5 times with PBS (200 µl per well).
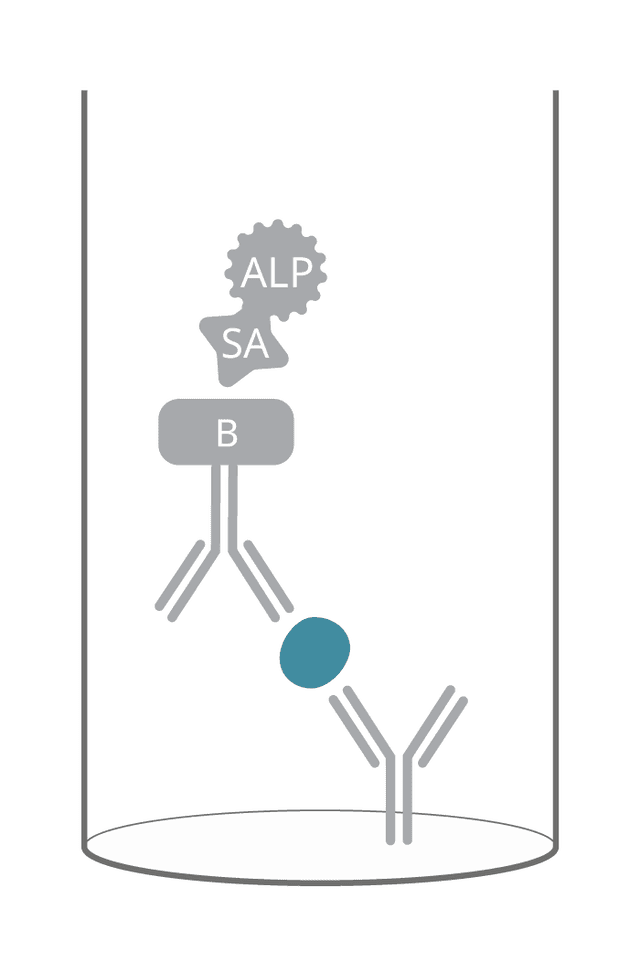
ELISpot is based on an enzymatic detection system. For most kits, the detection step is performed using a biotinylated detection antibody and, subsequently, streptavidin conjugated to an enzyme (“two-step detection”). However, for some analytes, we offer a detection antibody that is conjugated directly to the enzyme (“one-step detection”).
Two-step detection
One-step detection
Two-step detection
The detection antibody is conjugated to biotin, a small molecule with high affinity for streptavidin. Adding this biotinylated detection antibody is the first step. In the second step, a streptavidin-enzyme conjugate that strongly binds to biotin molecules on the detection antibody is introduced (see step 5). The addition of a compatible substrate completes the spot development (see step 6).
As there are several biotin molecules on each detection antibody and, in turn, each streptavidin-enzyme conjugate has multiple sites for biotin binding, the signal is amplified.
One-step detection
Choosing a detection antibody directly conjugated to the enzyme reduces the number of assay steps. This saves time, but results in lower signal amplification compared to the two-step detection system. However, the difference in sensitivity is small and, importantly, a slightly lower sensitivity can be beneficial for some experimental setups (e.g., in our ELISpot Path kit for TB) as it also reduces the background signal.
5. Add streptavidin-enzyme conjugate
Steps under section C in our ELISpot Flex protocols
Once the biotinylated detection antibodies have bound to the analyte, it’s time to add the streptavidin-enzyme conjugate. Of note, if the antibodies are directly conjugated to the enzyme, as in our ELISpot Pro kits, you can omit this step.
The enzymes we use are alkaline phosphatase (ALP) or horseradish peroxidase (HRP). ALP and HRP catalyze different chemical reactions, so different substrates are required. We recommend BCIP/NBT-plus for ALP-based ELISpot and TMB for HRP-based ELISpot kits (see step 6 for more details).
Tip! When working with HRP, avoid using buffers with the preservative sodium azide, as it inactivates the enzyme.
We use the term “conjugate” to describe a conjugation, a chemical binding, between two molecules. In this case, the conjugates are Streptavidin-ALP or Streptavidin-HRP, i.e., an enzyme conjugated to streptavidin. Streptavidin is used because it binds with high affinity to biotin on the detection antibody.
In general, you can choose to use ALP or HRP; both enzymes are suitable for most applications. If you are new to the world of ELISpot, we recommend that you choose ALP. This is because the HRP/TMB reaction is very rapid in some experimental setups and therefore more difficult to stop at an optimal time point. In addition, the BCIP/NBT-plus spots last forever, whereas the TMB spots tend to fade with time.
6. Add substrate
Steps under section C in our ELISpot Flex protocols
In ELISpot, the substrate needs to be able to form a precipitate, meaning that it settles at the bottom of the well after being catalyzed by the enzyme. The precipitate creates what we call a “spot”.
There are numerous precipitating substrates on the market, but we recommend BCIP/NBT-plus for ALP-conjugates and TMB for HRP-conjugates. Both are highly sensitive and generate distinct spots that are easy to evaluate.
Do not use ELISA substrates for ELISpot
Spot counts for different enzyme-substrate combinations.
ELISpot developed with different substrates. Left to right: TMB, BCIP/NBT-plus, and AEC
The development time depends on factors such as the analyte, detection antibody, enzyme-conjugate, substrate used, and the amount of analyte secreted. If you use reagents that we do not supply, you may have to titrate the detection antibody and streptavidin-enzyme conjugate to find the best working concentrations. If the reagents are supplied by us, you can just follow the kit protocol 😊.
As a general recommendation, develop the plate until distinct spots in positive control wells are visible to the naked eye. The development time varies, but we are talking minutes, not hours; when using our ELISpot Plus or ELISpot Pro kits, the HRP-TMB reaction is faster (2-10 minutes) than the ALP-BCIP/NBT-plus reaction (3-15 minutes). If you are using other substrates with our ELISpot Flex kits, the development time can be up to 20 minutes for HRP-TMB and 30 minutes for ALP-BCIP/NBT-plus. Be aware that over-developing at this step may result in a dark background and lower the contrast of the spots. It is a good practice to find the optimum color development time for every project, analyte, and sample type through pilot experiments.
The method for stopping the reaction depends on whether you use BCIP/NBT-plus or TMB:
Tip! The first time you develop a plate for new project, use a dissection microscope to monitor and time spot development in the positive control well. Use the same development time for subsequent plates in the same project.
| Enzyme+substrate | Development time | To stop, wash with |
|---|---|---|
| ALP+BCIP/NBT-plus | 3-15 min | Tap water |
| HRP+TMB | 2-10 min | Deionized water |
Deinonized water is always ok for stopping the reaction, but vital for HRP+TMB as ions and altered pH may cause TMB spots to fade
7. Analyze the developed plate
Steps under section C in our ELISpot Flex protocols
You’re done with the wet-lab part, now it’s time to count the spots.
Plates need to be completely dry before analysis. If you are not in a hurry, leave the plate to dry overnight. To reduce the drying time to around 30 minutes, we usually place plates upside down in a laminar flow hood.
If you are using an MSIP plate with an underdrain attached to the bottom, detach the underdrain carefully (using e.g., a pair of pliers) before placing them in the hood. For a detailed guide on plate handling, see the video below.
It is possible to analyze ELISpot plates with a light microscope, but to save considerable time and minimize errors, we recommend that you use an automated reader such as Mabtech ASTOR™ or Mabtech IRIS™. These readers are built for easy use and reliable results.
When analyzing plates it is important to consider that, although many processes are automated in a reader, you are in control over which spots to count. With Mabtech Apex™, the software for ASTOR and IRIS, the default count settings are adequate for most situations.
But, similar to gating populations in flow cytometry, you can use sliders for size and intensity to determine which spots you consider relevant. In flow cytometry, one uses fluorescence-minus-one controls to get an idea of where to set the gate, whereas in ELISpot you decide on a count setting based on your experience. As ELISpot is so sensitive, it’s not uncommon to have spots in your negative control wells. That’s ok! We highly recommend to not subtract these spots from the “real” spots, but rather to use a statistical analysis where negative control spots are taken into account for when deciding on whether you are looking at a positive response. Please read more about this statistical method, called DFR, here.
What is a positive ELISpot result? Use the statistical method DFR for proper analysis.
Finally, when you have decided on a count setting, it’s good practice to choose a consistent count setting throughout the project (for all wells and plates treated in the same way).
Below is a tutorial on how to analyze ELISpot plates using the software Mabtech Apex in ASTOR.
